
AI facade prompting should not start with an empty text prompt. In an architectural workflow, many things are already defined before the facade is designed: the site, brief, building envelope, floor levels, setbacks, required distances and early planning constraints. These parts need precision. They are faster and safer to define in CAD than to describe in a prompt.
The useful principle is simple:
Model what is already defined. Prompt what is still open.
If the massing, floor levels, facade plane, camera and context already exist, give them to the AI as a base image. If a facade elevation, material board or reference image already exists, give it to the AI as visual input and explain what it should use. The AI cannot read the expectations in your head. It can only work with what you make visible in the image, the reference and the prompt.
This article shows two practical workflows:
- The facade is not designed yet and AI helps explore directions.
- The facade already exists as a 2D design and AI helps visualize it on a perspective base image.
You will learn how to prepare a useful massing image, how to use reference images without confusing the AI and how to write copyable facade prompts.
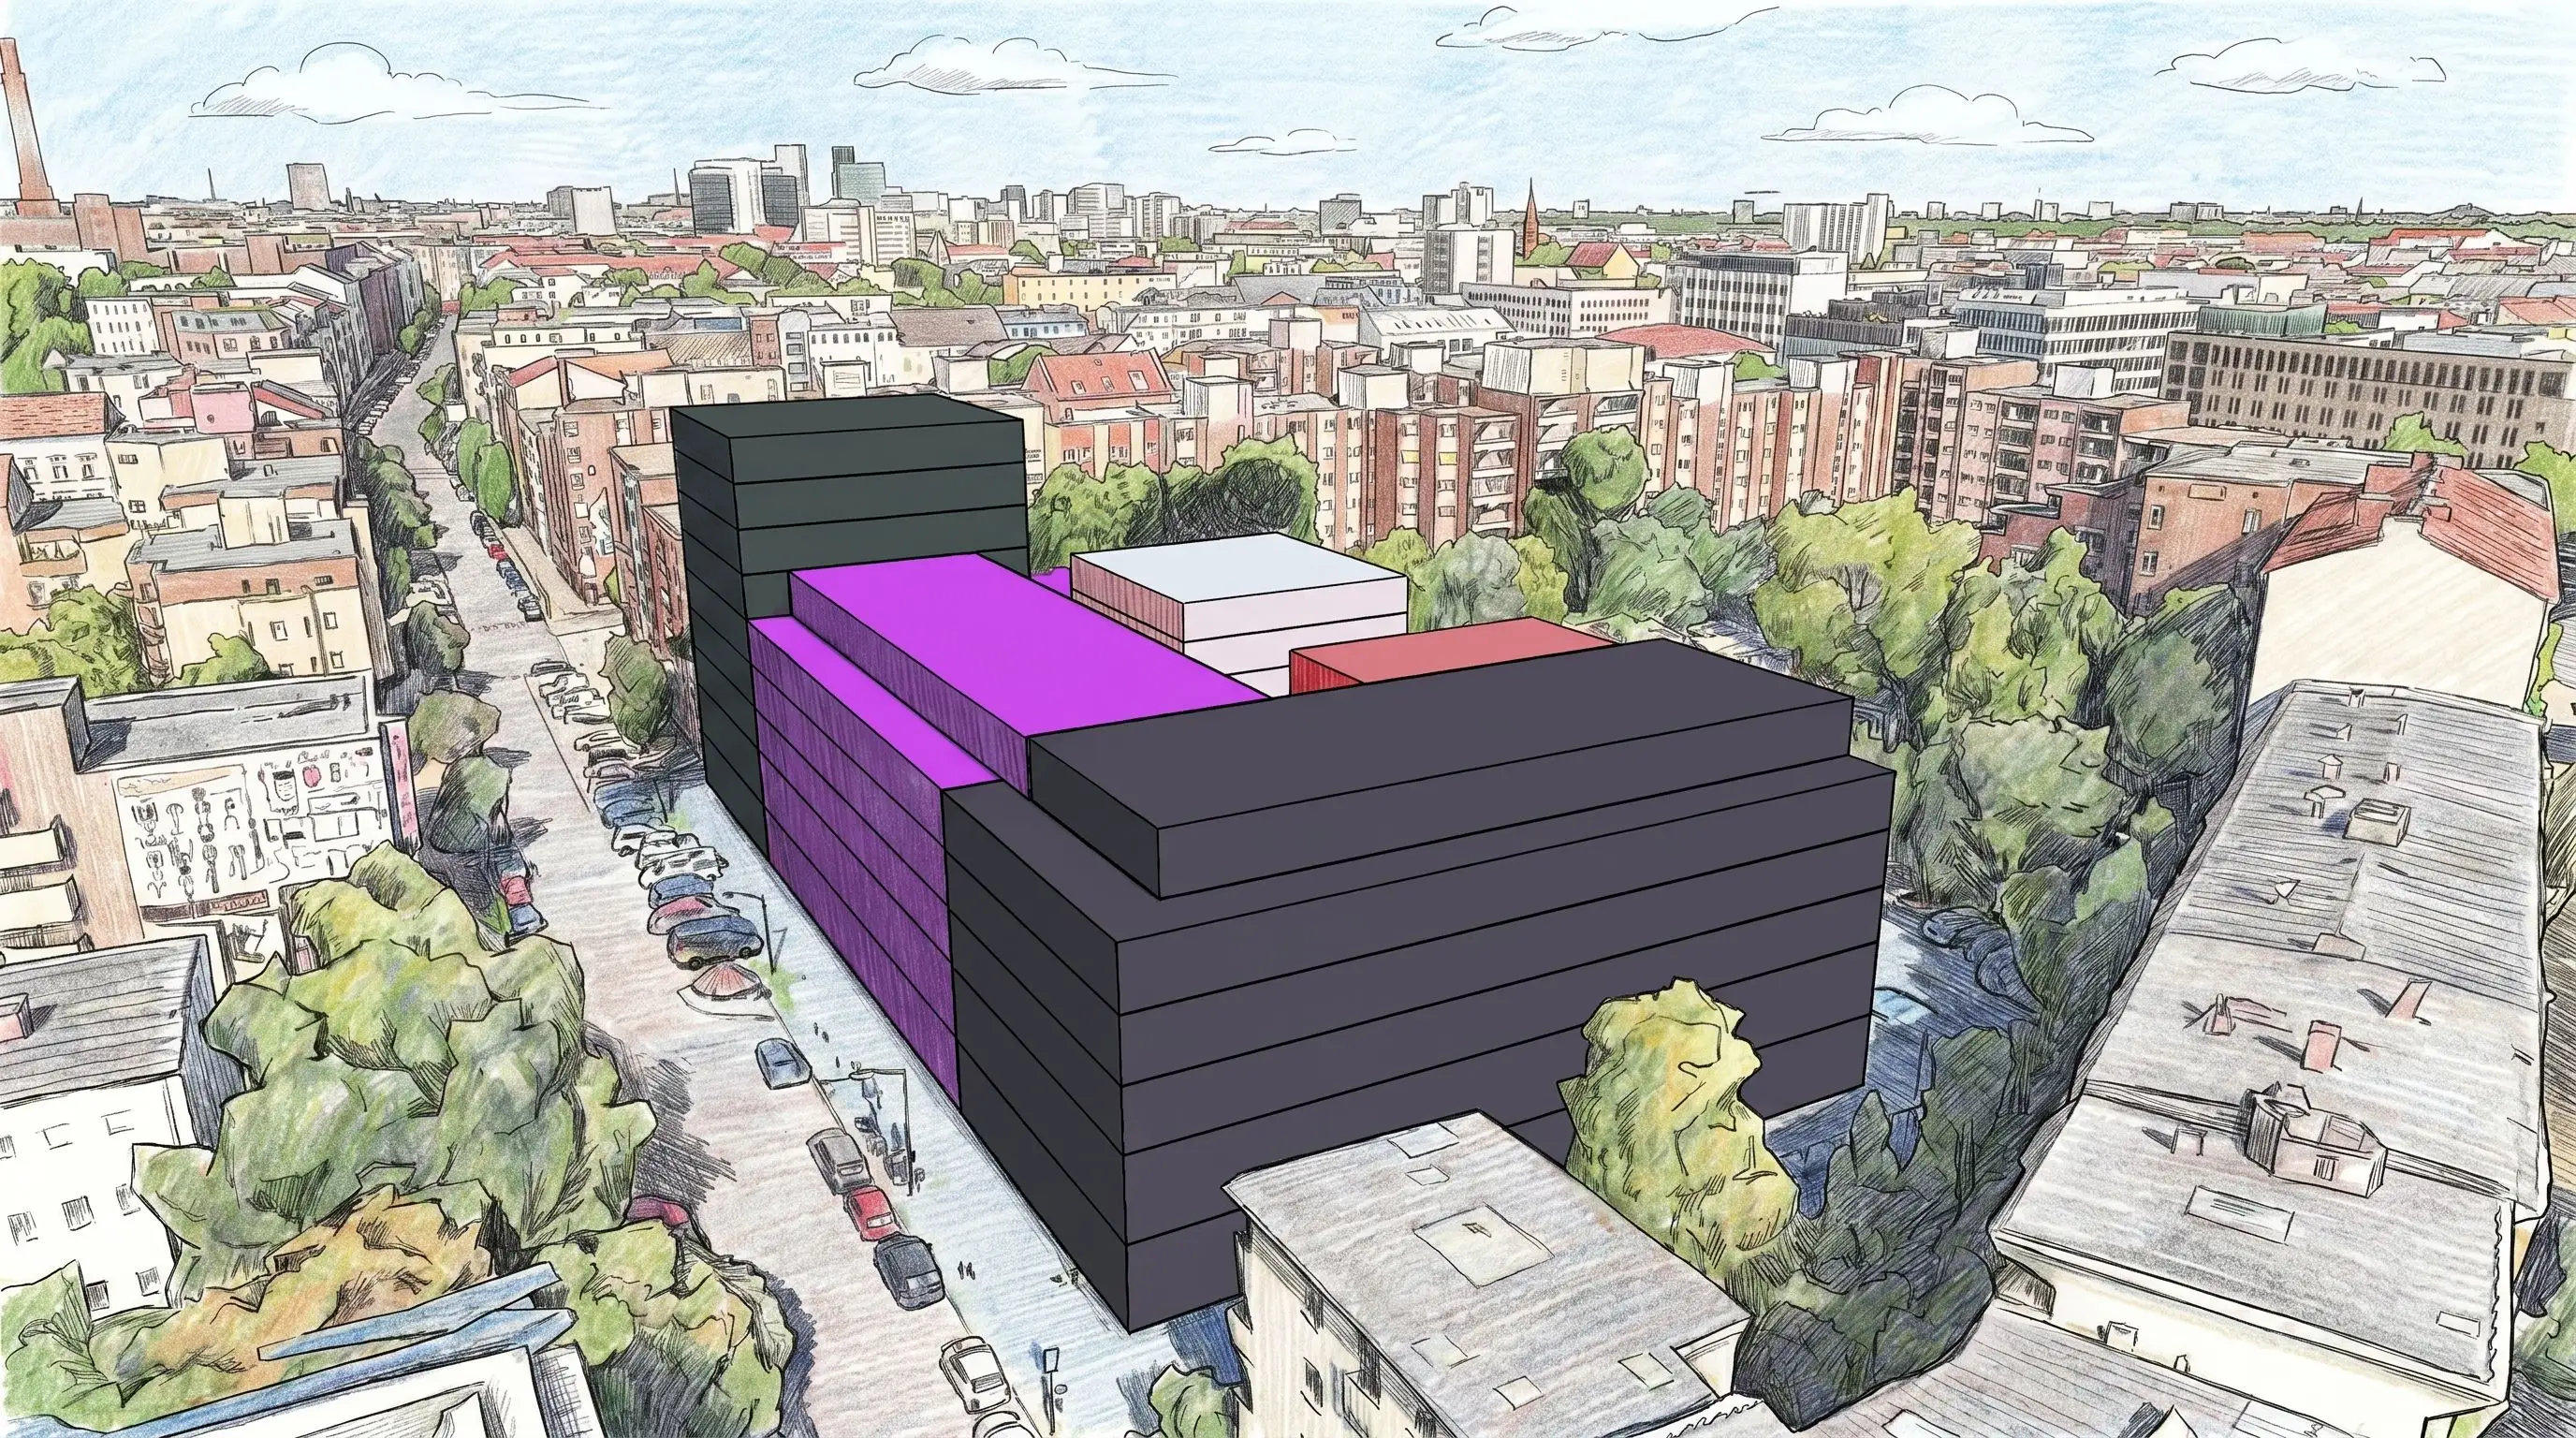
/assets/images/facade_prompting_blog/base_rendering.webpFirst create the massing, then prompt the facade
Prompting the shape of a building from scratch is rarely useful for architects. Exact heights, floor levels, stepped volumes, setbacks and site-specific envelope logic are already project constraints. A prompt can easily produce something that looks plausible, but does not match the actual project.
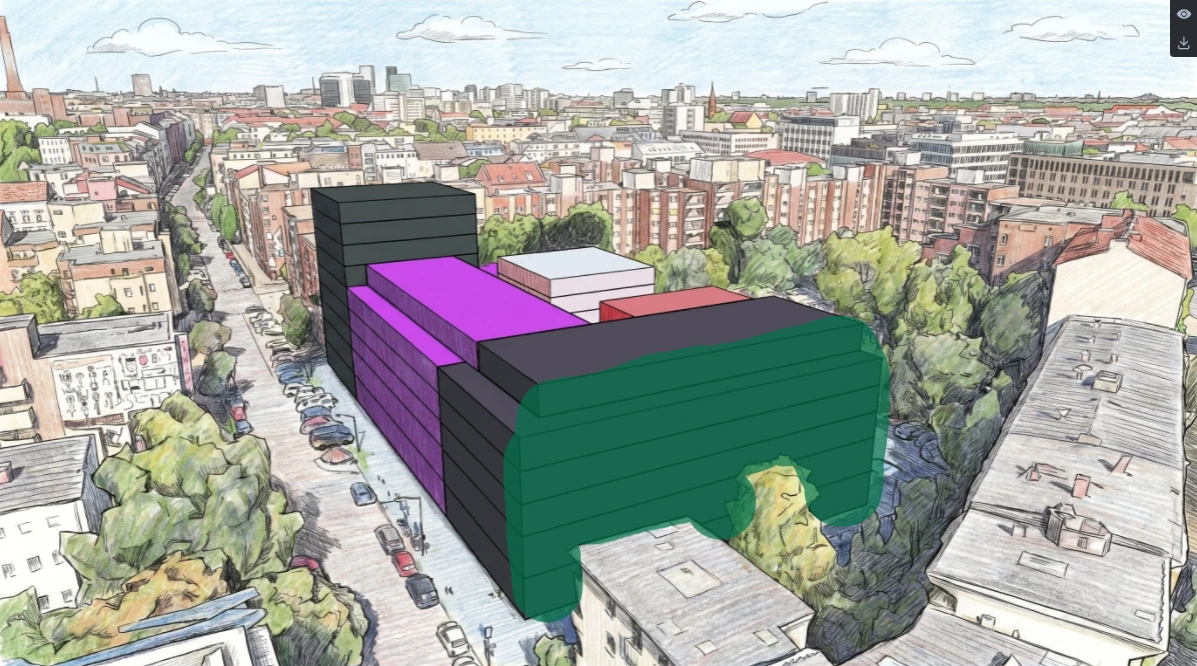
Create a simple CAD massing first. It does not need facade detail. That is exactly what the AI can help you explore later. The massing only needs to define what must stay controlled: volume, height, floor structure, facade plane, perspective and context.
Prepare a base image the AI can actually use
A useful base image makes the building logic readable. If the AI has to guess the volume, floor structure, facade plane or camera angle, the facade result becomes random quickly. The cleaner the base image, the easier it is to control the design direction.
Use the perspective you want to evaluate later. AI tools can change facade style, material and atmosphere, but they are not reliable tools for fixing a wrong camera angle or field of view.
Build the massing floor by floor
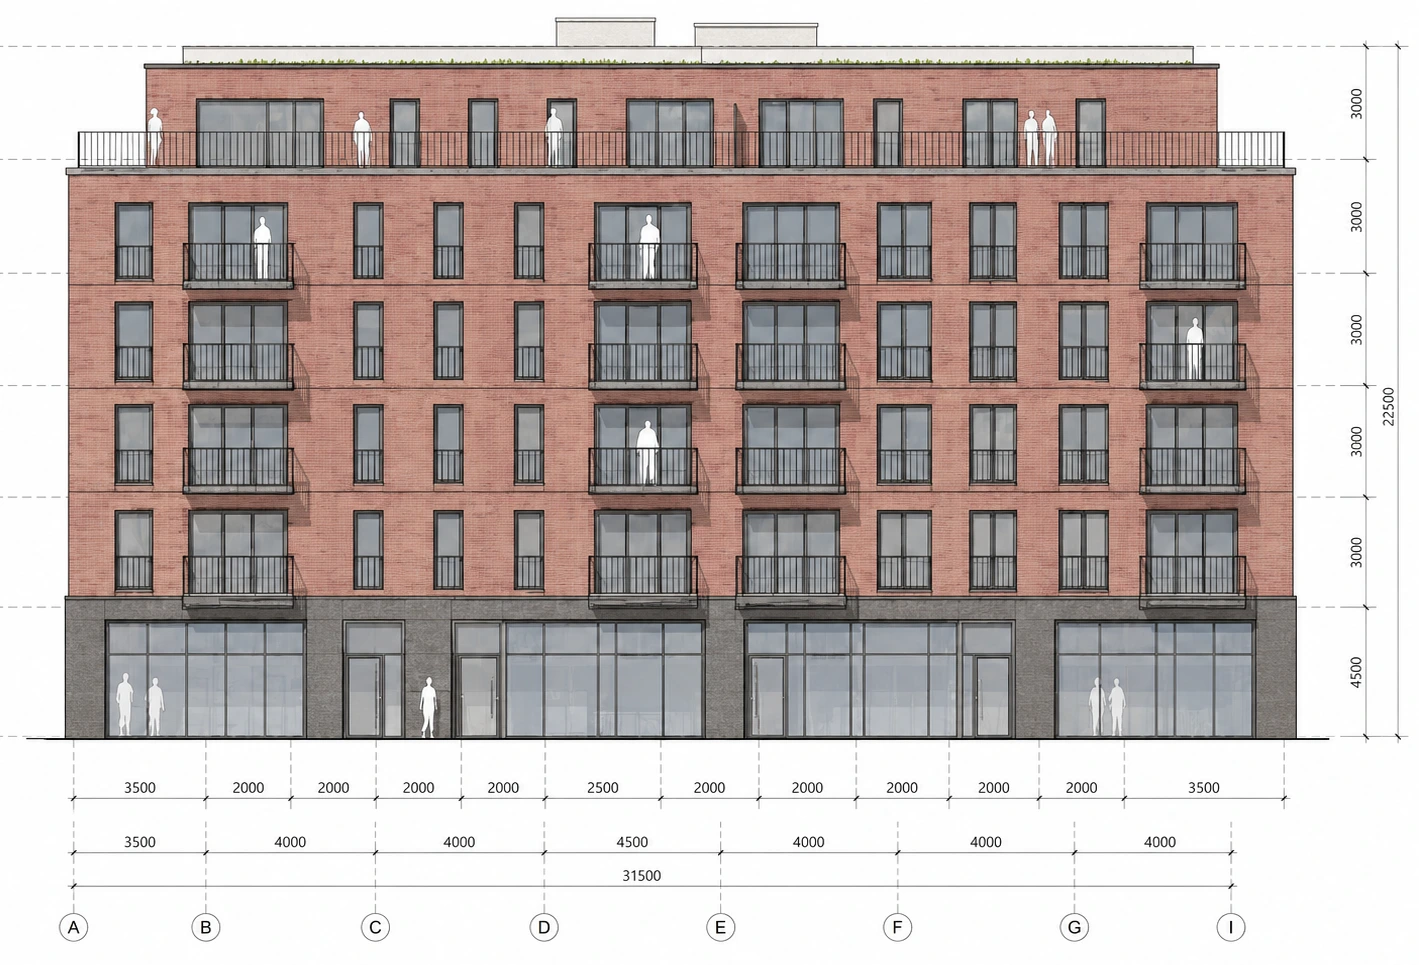
Model each floor as a separate simple volume or slab so the floor structure is visible in the base image. This is one of the most important steps for facade prompting.
Floor levels are usually already defined in early design stages. They should not be reinterpreted by the AI. This becomes especially unreliable when the building has different heights, set-back top floors or multiple connected volumes.
A simple floor-by-floor massing gives the AI and the viewer a clear architectural base: height, proportions, slab rhythm and facade zones are already set. The facade prompt can then focus on material, openings, depth and expression. Thirty minutes of CAD work can save hours of prompting.
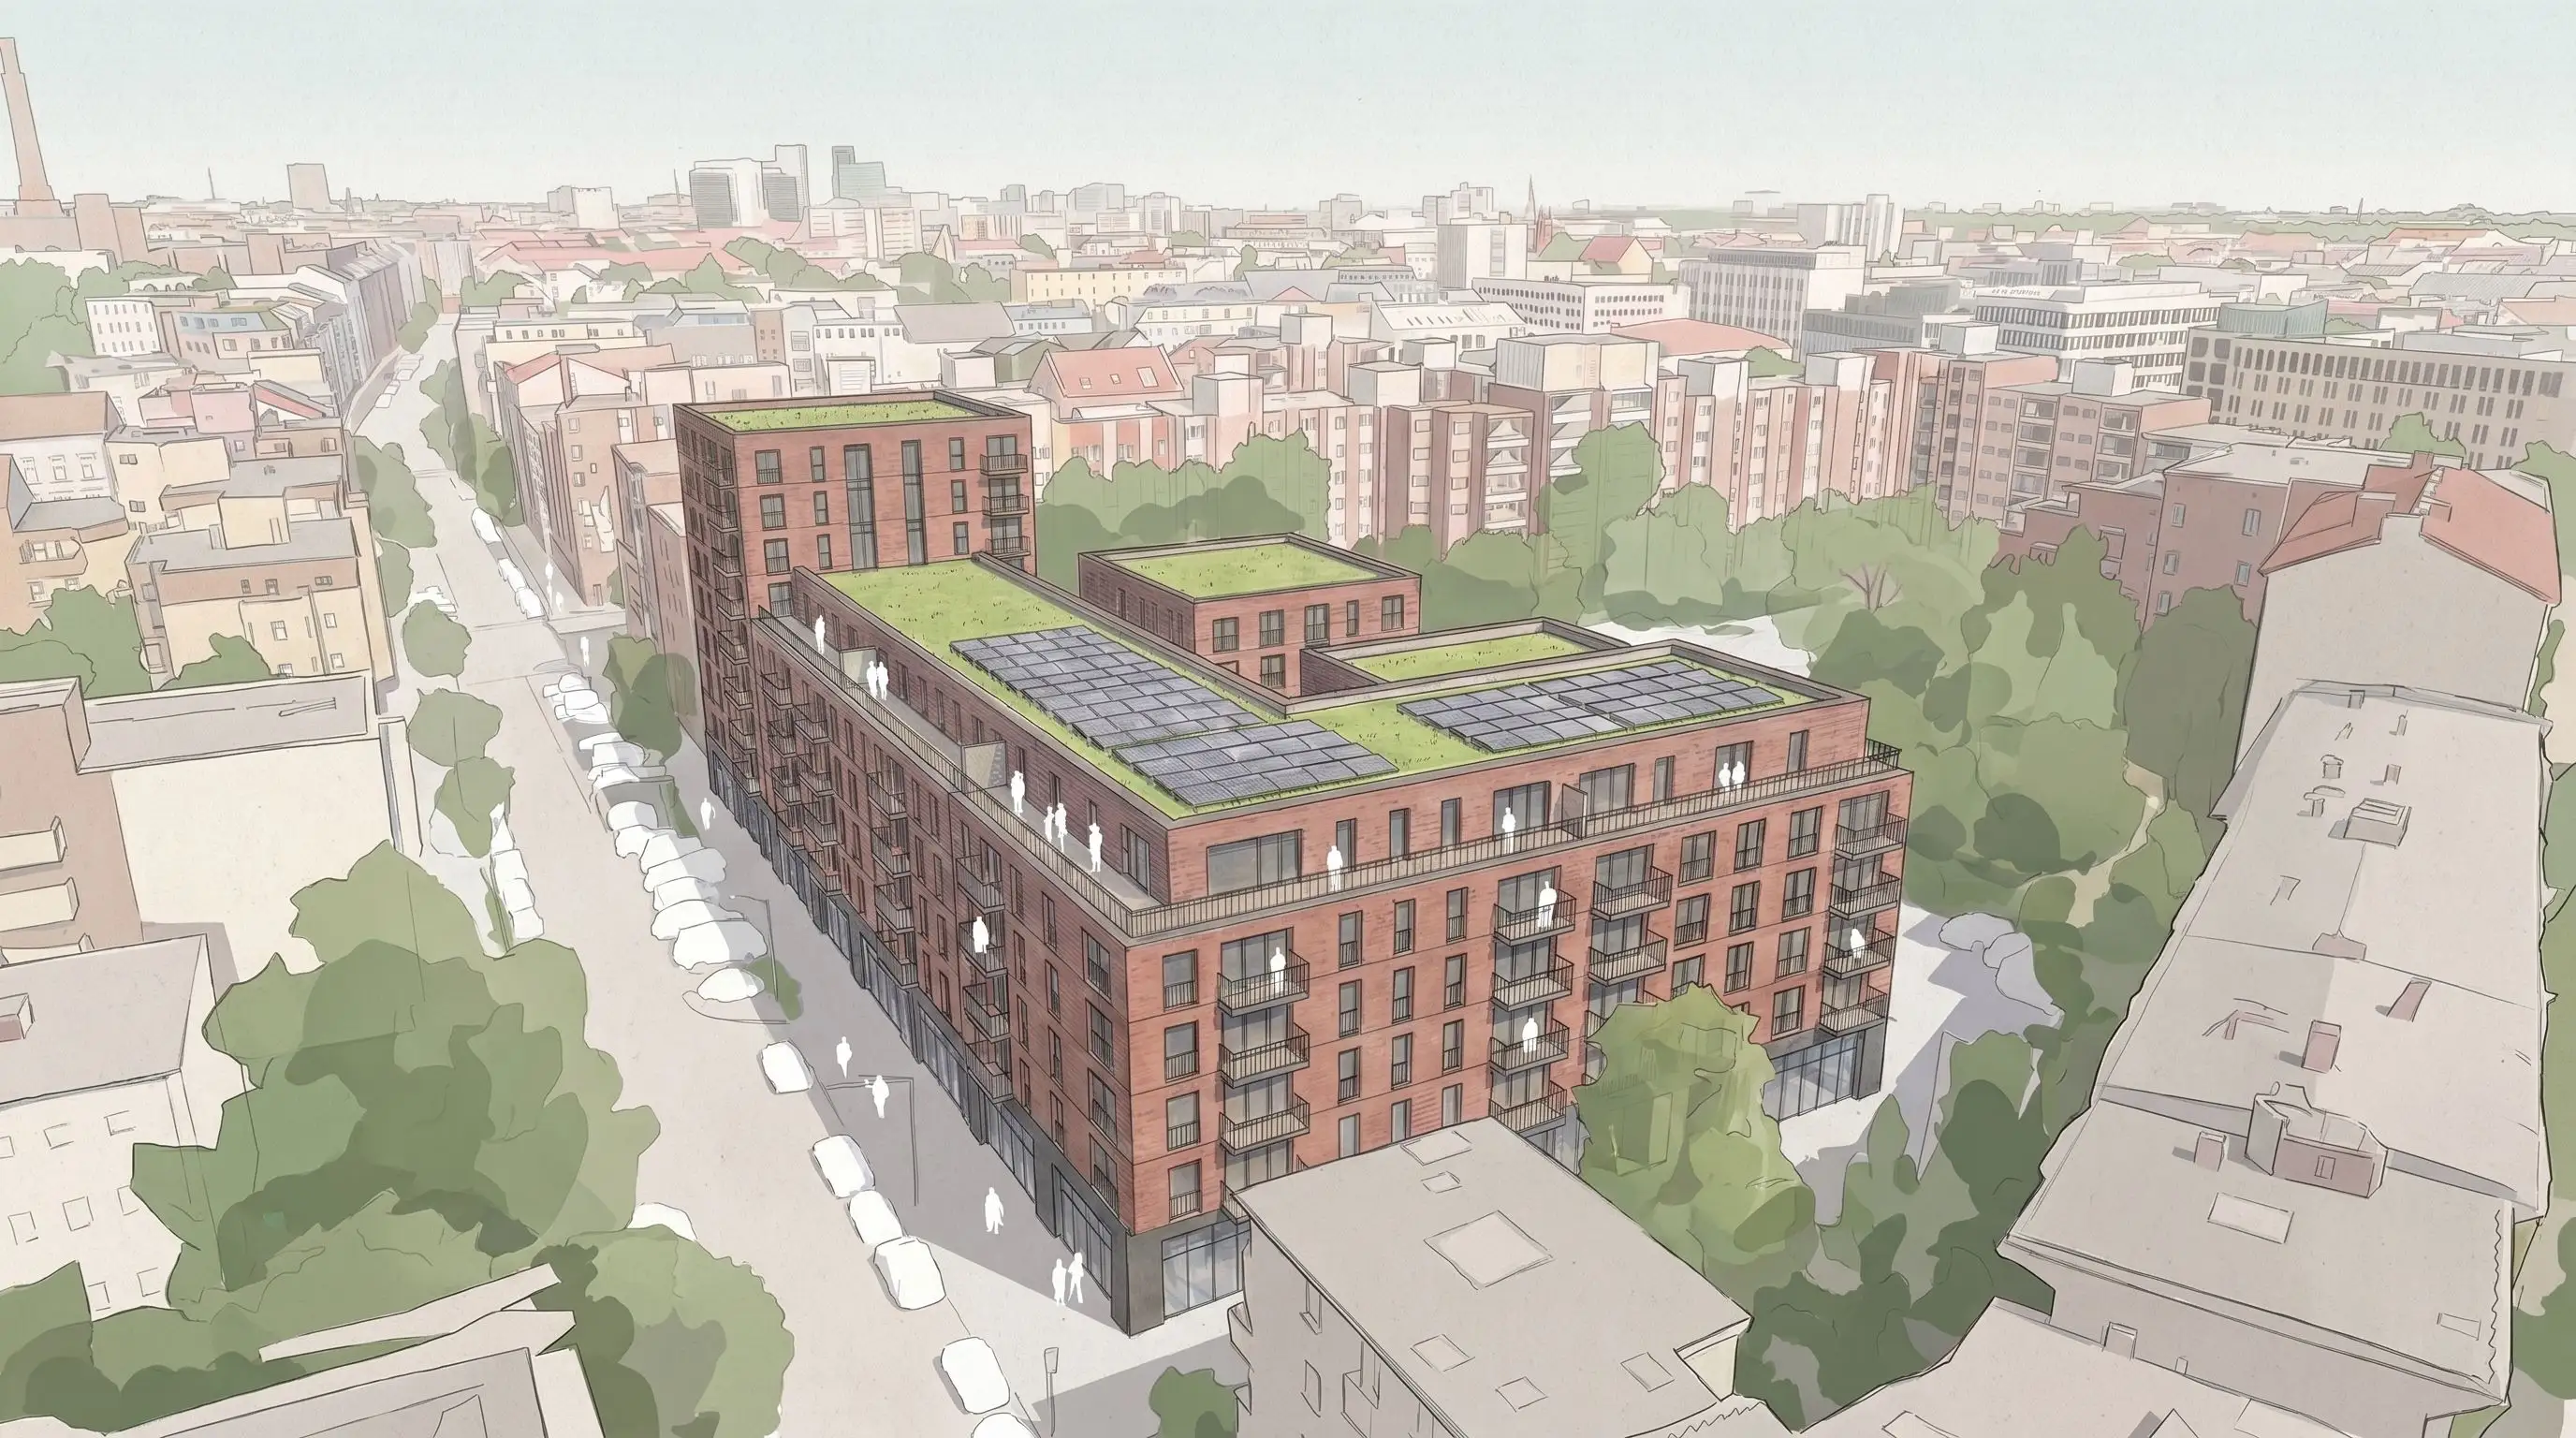
Add useful surrounding context
A facade option becomes easier to judge when the image shows how the building meets the street, neighboring buildings and sidewalk.
You have two practical options:
- Use a photorealistic or map-based surroundings model, for example from Google Maps-based workflows, if your toolchain provides one.
- Use a simplified urban context model from data providers such as TopoExport.
TopoExport provides 2D maps and 3D models with layers such as buildings, parcels, roads, trees, contour lines and terrain, with export formats including DXF, IFC, OBJ and STL. Free CAD files are available for areas up to 1 km2.
Keep the facade plane clear
The facade area you want to work on should be visible and unobstructed. If you have added an environment model, avoid views where trees, cars, people, signs or strong shadows cover the main facade. Small context elements are fine, but they should not block the part of the building you want the AI to change.
Avoid extreme wide-angle views or steep angles where the facade plane becomes too distorted. If the facade becomes a thin angled surface in the image, the AI has less information to work with.
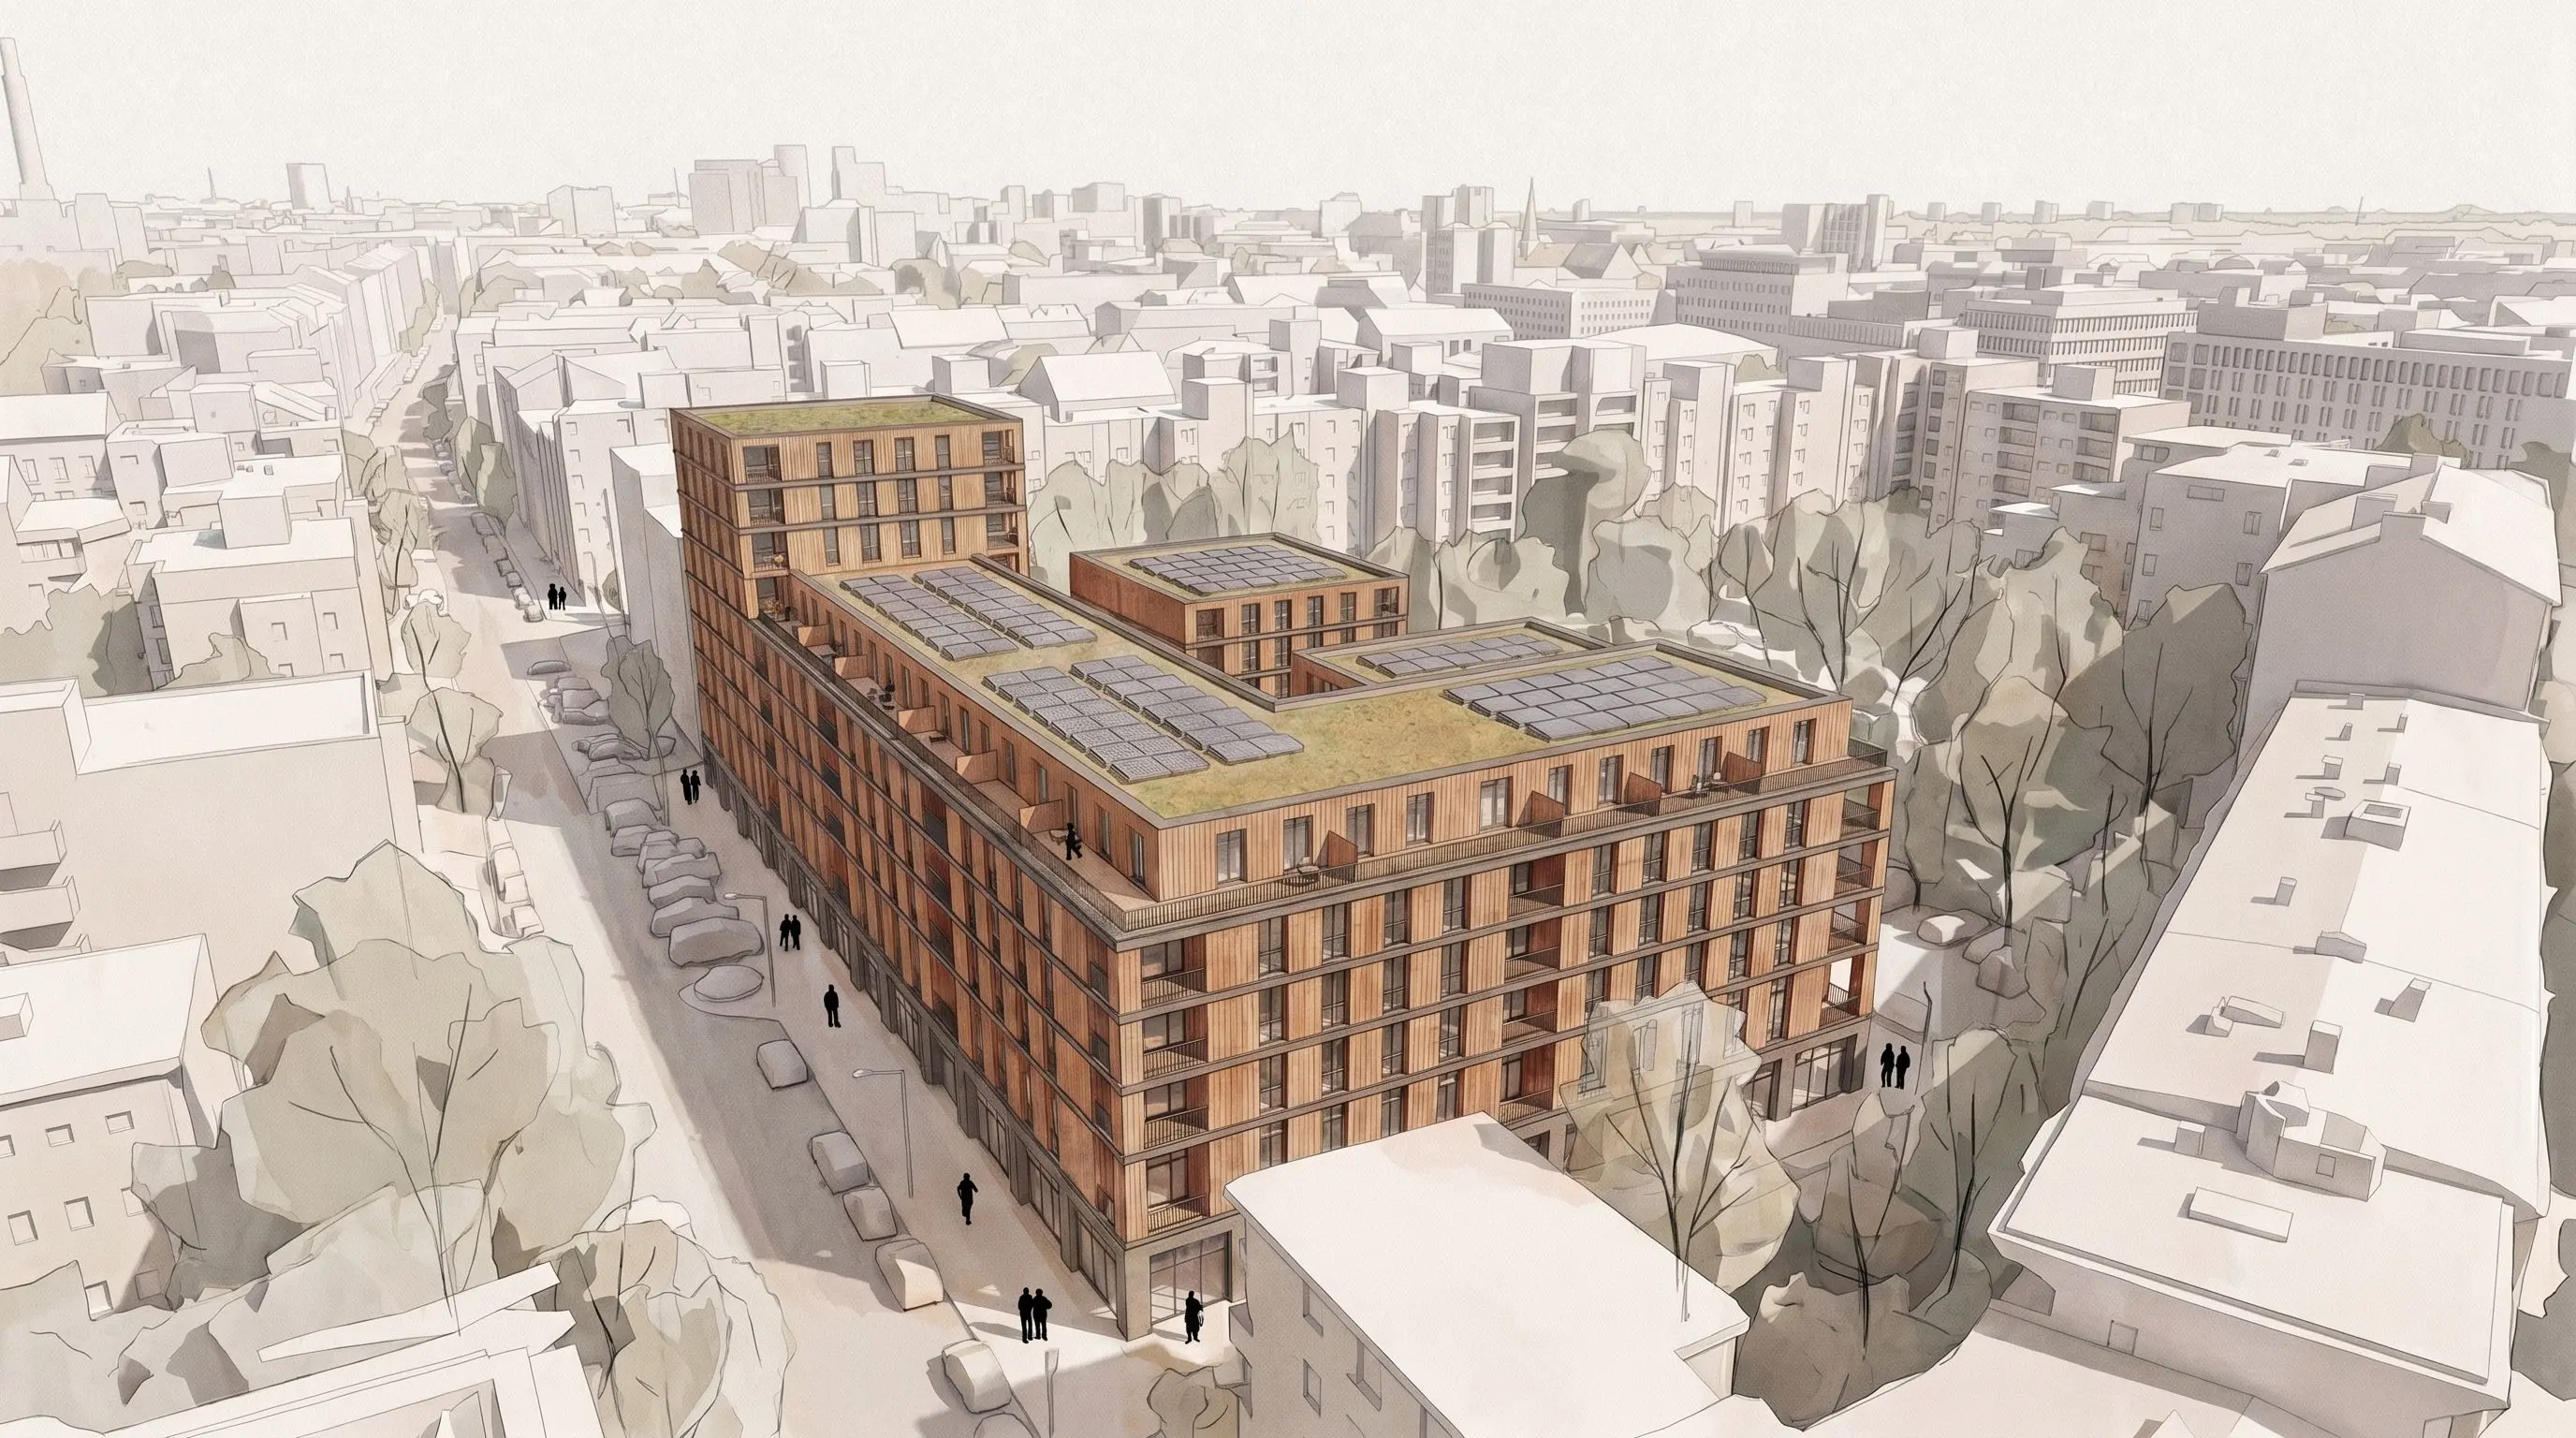
Export a boring editing image
For facade prompting, the base image does not need to look finished. A normal export from a CAD or modeling program is often enough.
Use neutral daylight, a simple white, light grey or clay material and a clear view of the facade. Avoid heavy shadows, dramatic sunset light, strong textures, random placeholder materials and large foreground objects. Final atmosphere, vegetation, people and lighting can be added later after the facade has been applied to the image.
Before writing the prompt, check the base image and ask:
Can someone understand the building volume, floor structure, facade plane, perspective and context without reading my mind?
If yes, the prompt can focus on the facade design. If not, the prompt has to compensate for missing information, and the result will usually become less controlled.
Use reference images with a clear job
A reference image is not automatically useful. It only helps if the AI understands what it should take from the image.
For facade prompting, the strongest starting point is usually a complete design reference. This can be a facade you like, a previous project, a precedent building, a 2D facade study or a rendered concept. It gives the AI a coherent architectural direction before you refine details.
A good facade reference should focus on the facade. It can include some surrounding context because scale, floor height and street relation are useful, but the facade should remain the main subject. If the image is mostly sky, landscape, interior view or atmosphere, it becomes harder for the AI to understand which architectural decisions matter.
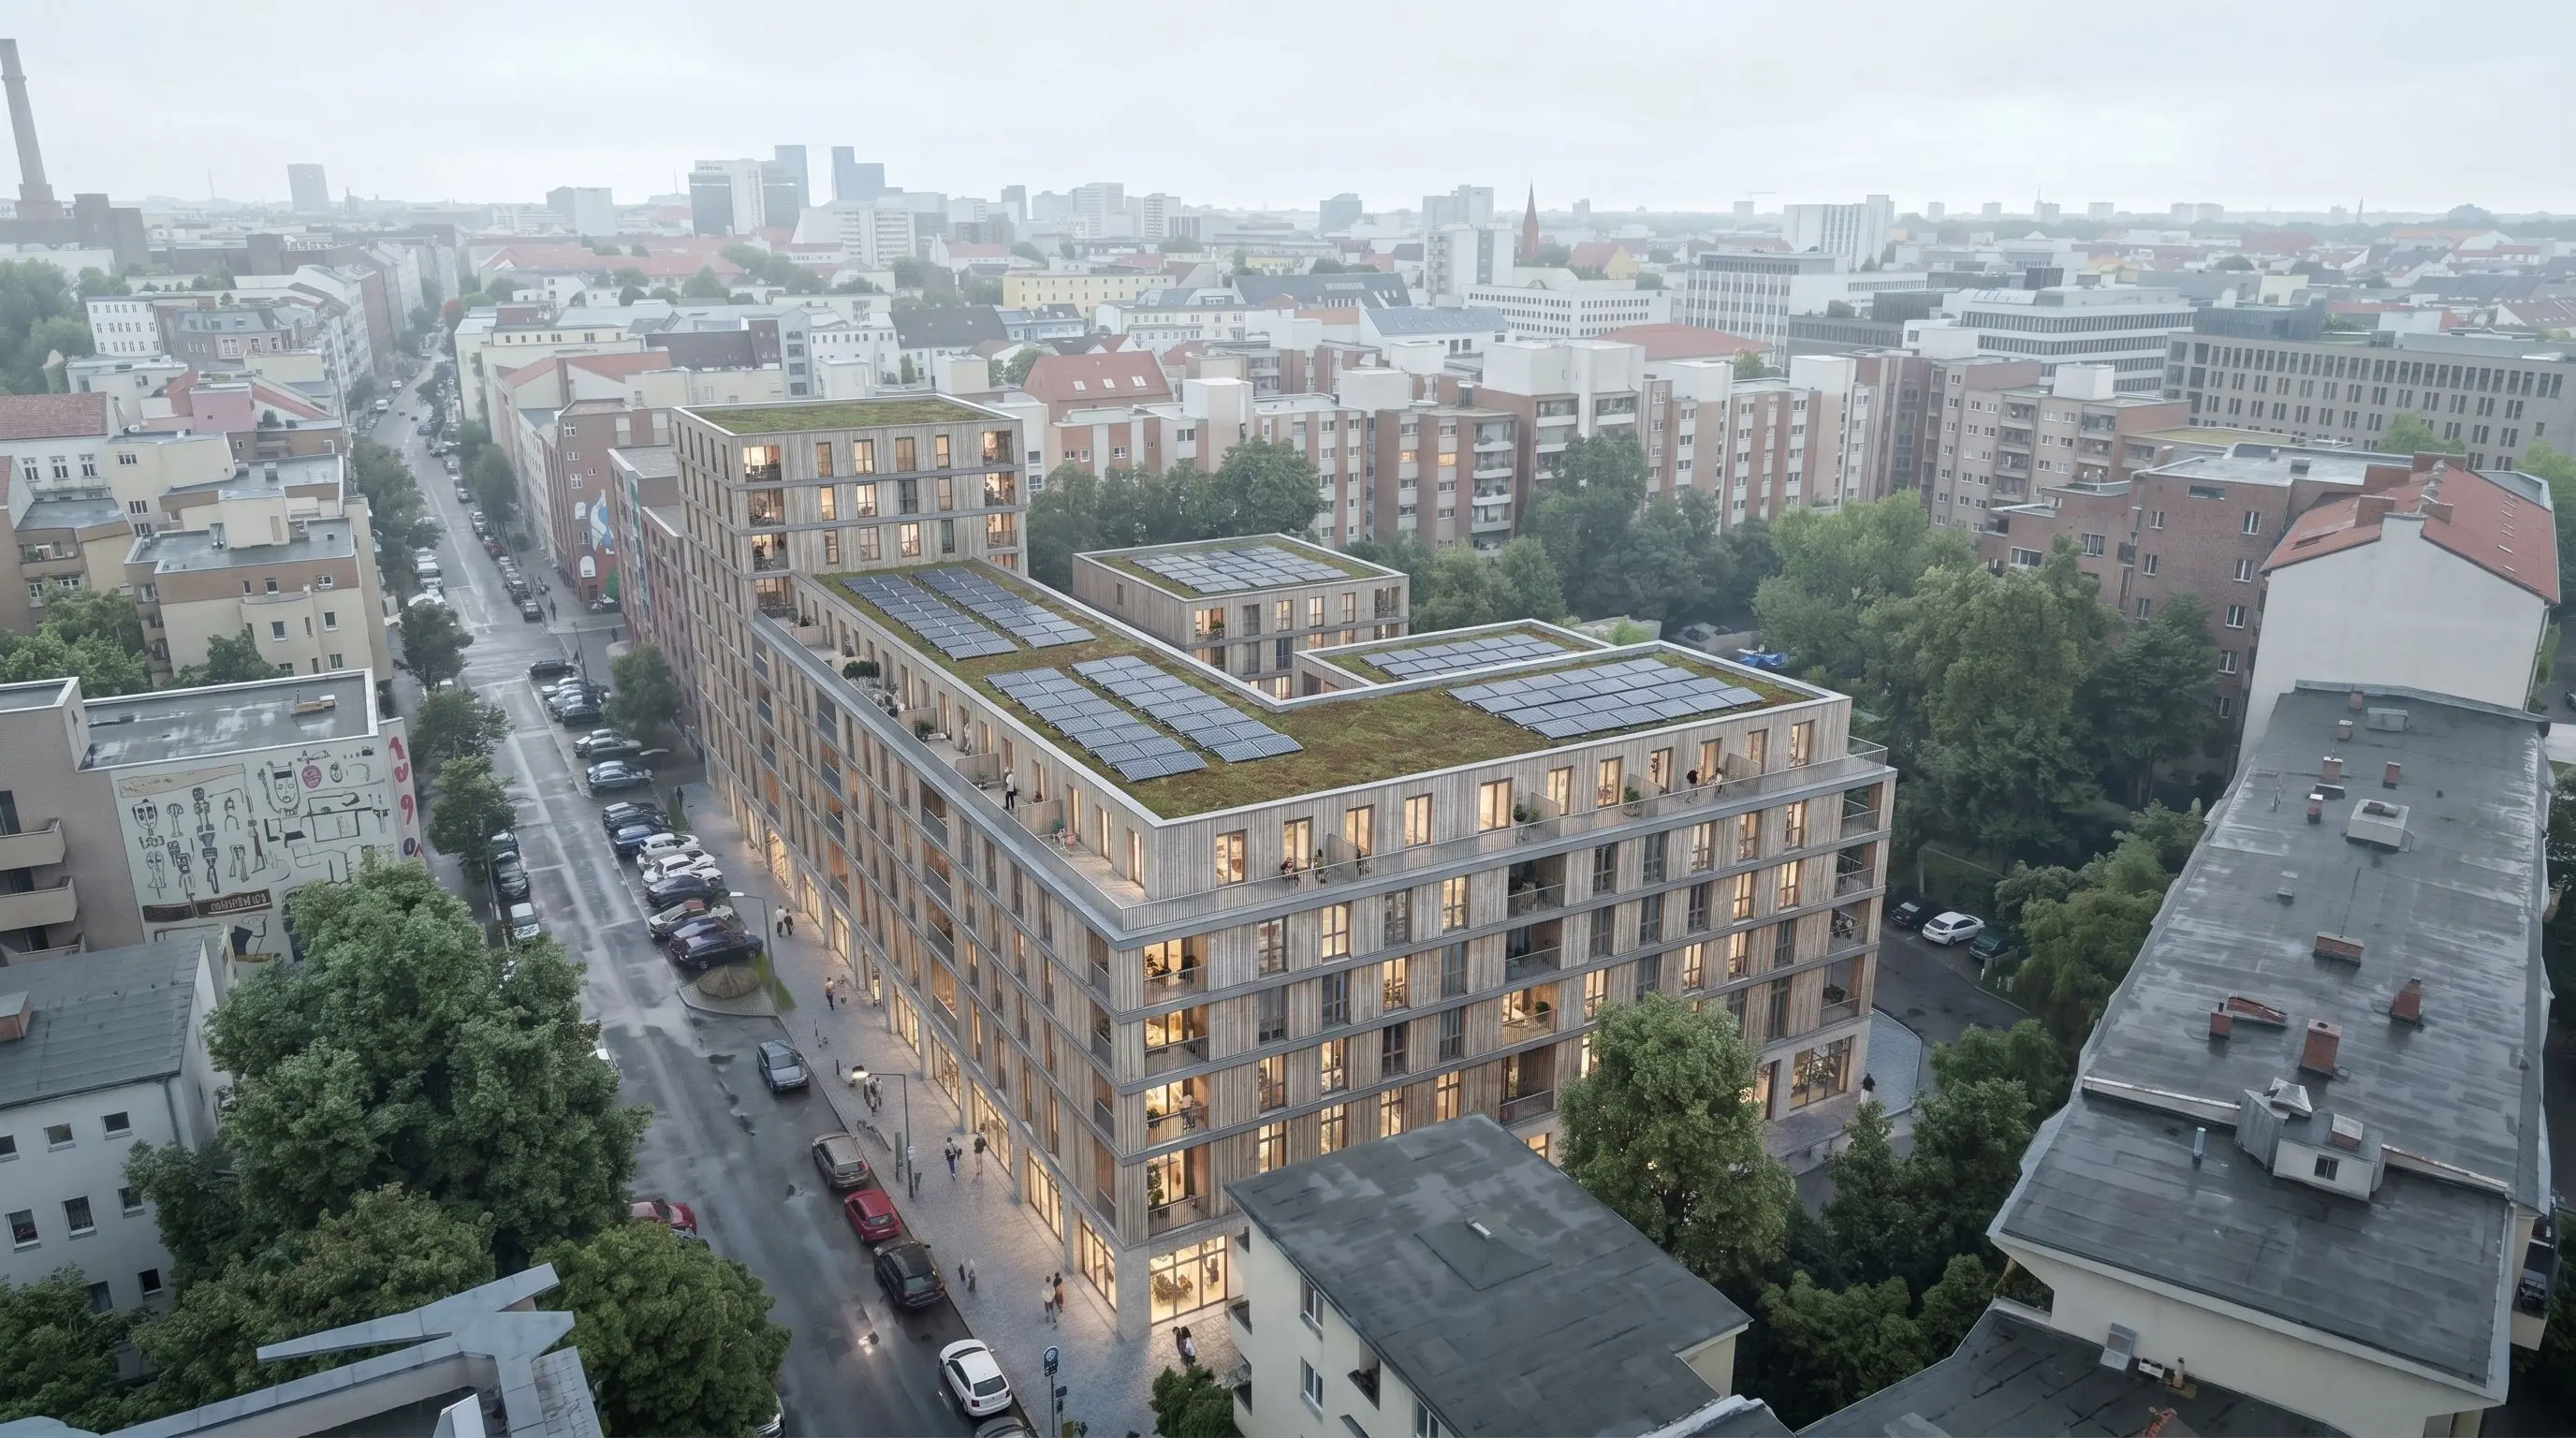
/assets/images/facade_prompting_blog/reference_wood.webpDo not just upload the reference and hope the model understands your intention. Tell it what the reference is for.
Example:
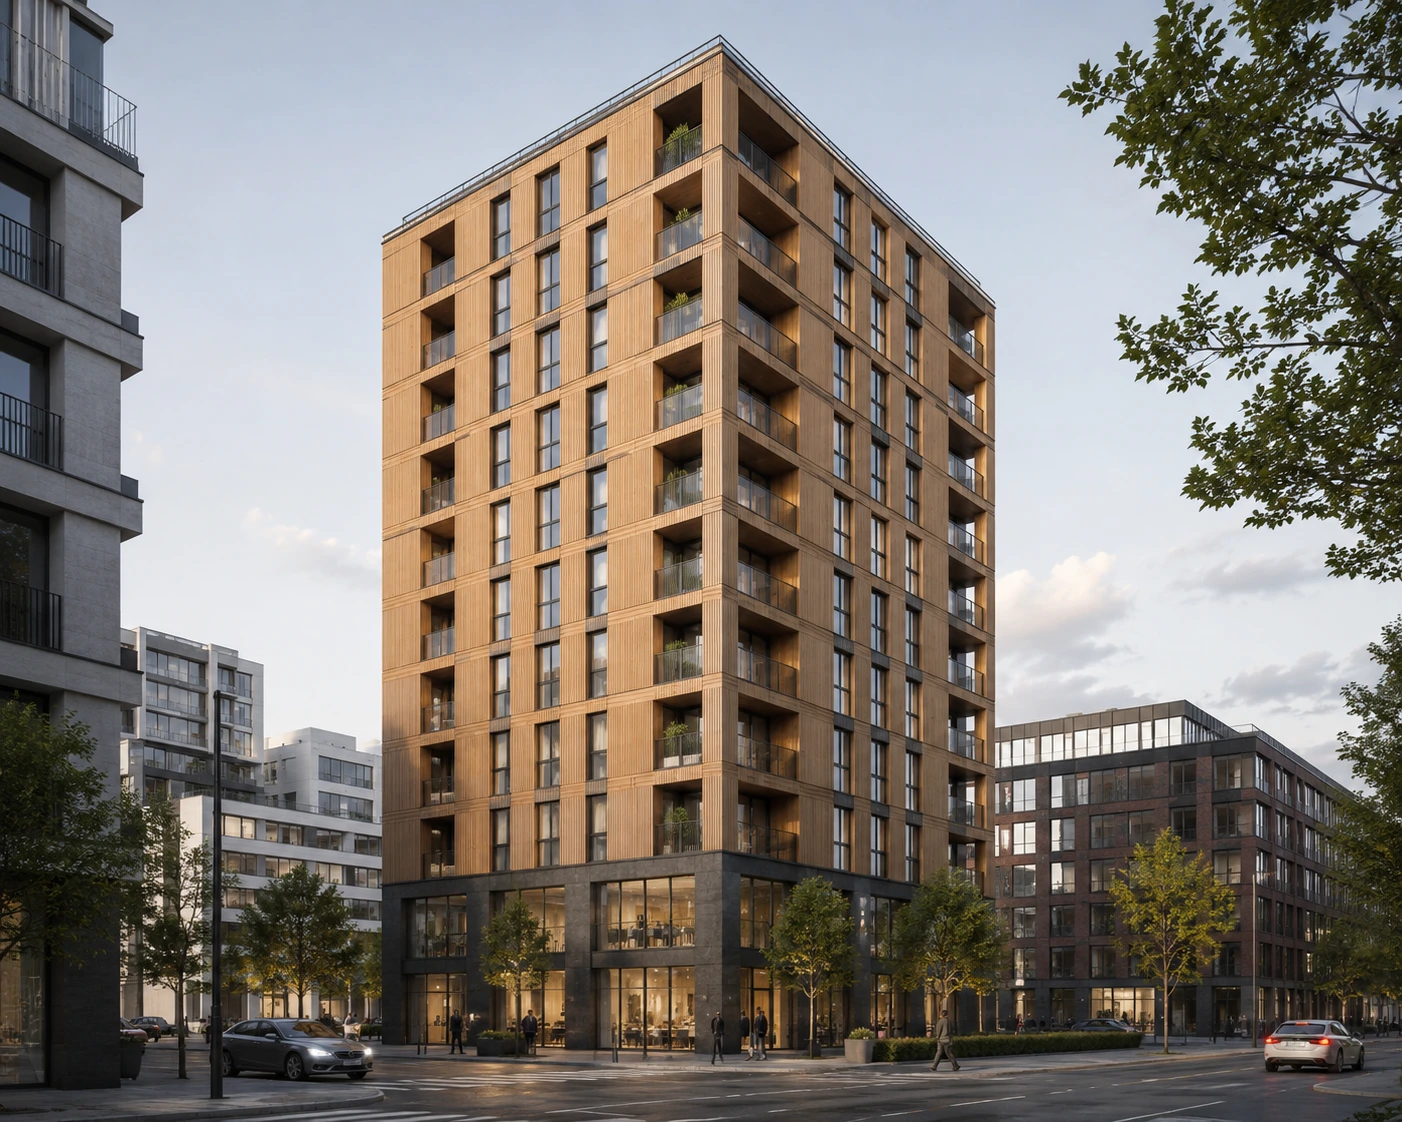
Use the reference image as the main facade direction. Transfer its overall facade logic to the base image: a warm vertical timber facade, regular floor-by-floor window rhythm, deep recessed loggias, slim dark window frames, subtle horizontal slab lines and a darker mineral ground floor plinth with large transparent openings. The floors are separated by vertical lines on the massing model. Please keep the floors clearly separate in the final image.
This is useful when you want to start from a coherent architectural idea instead of assembling random facade details one by one which is a lot more difficult for the AI.
/assets/images/facade_prompting_blog/moodboard_wood.webpUse focused references for detail control
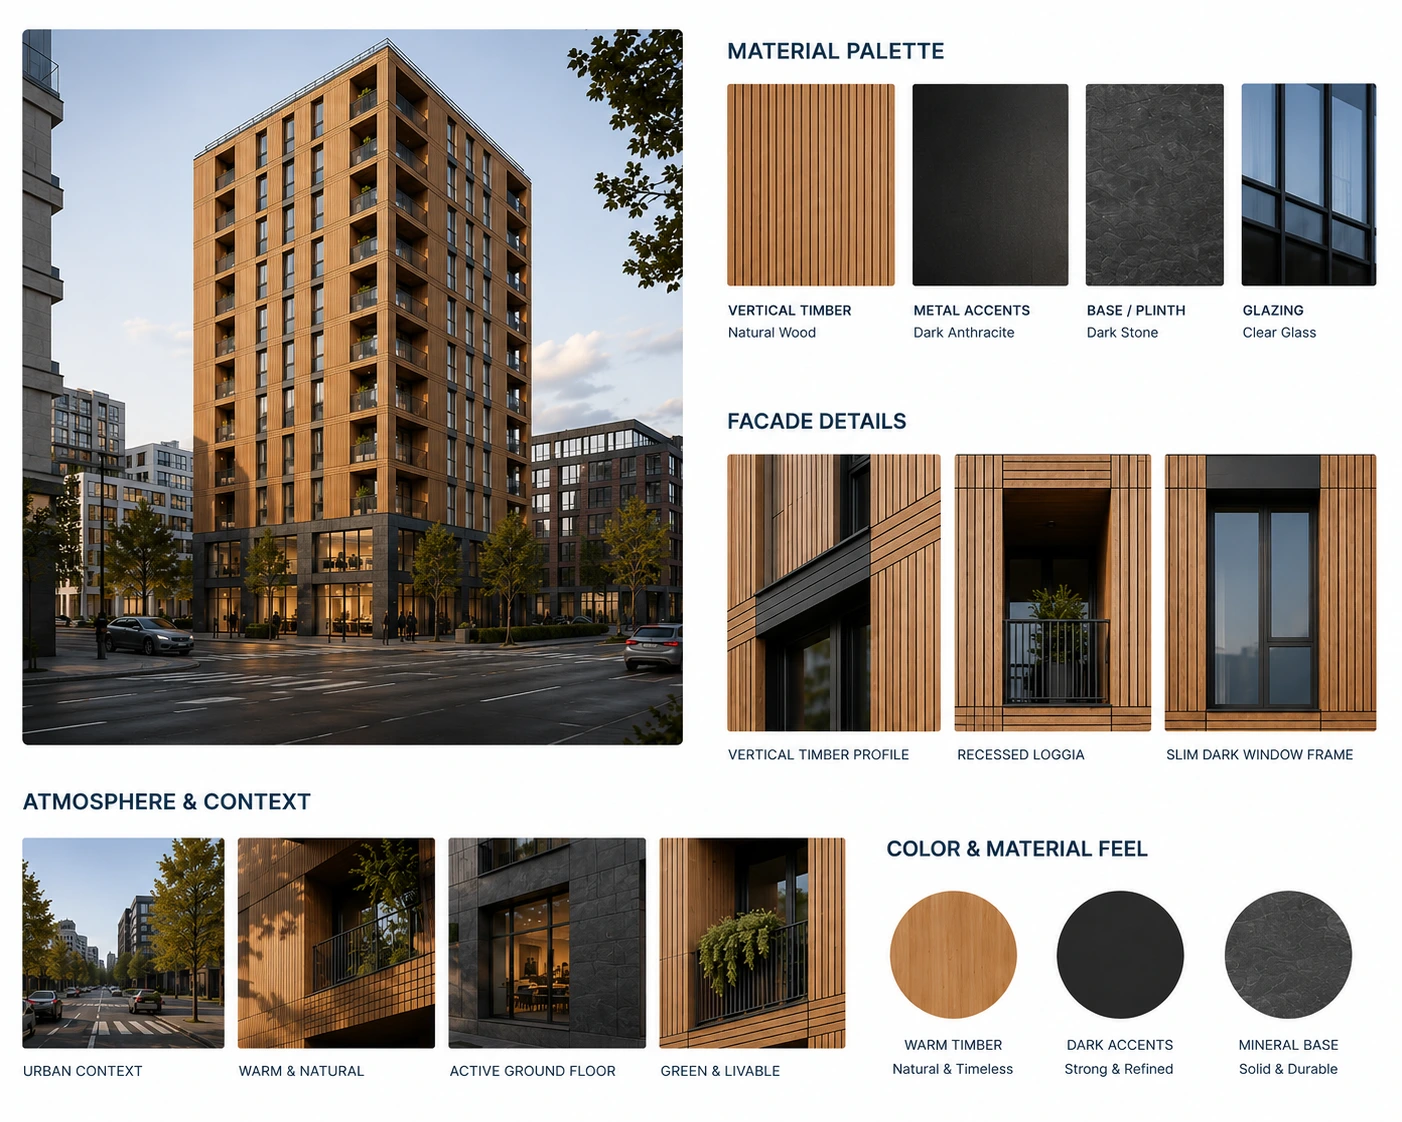
Once the overall facade direction is clear, smaller references become more useful. Use focused references for one specific topic: material tone, facade rhythm, window proportions, balcony or loggia logic, ground floor treatment or atmosphere.
The reference should contain only the part the AI should care about right now. If you want better balconies, crop the reference to the balcony condition. If you want deeper reveals, crop the window detail. If you want a clearer plinth, crop the ground floor. A quick screenshot is the fastest way of cropping the reference and removes everything that distracts from the detail you want to reproduce.
Example prompt:
Use the focused reference screenshot only for the recessed loggia detail. Apply a similar depth, shadow and railing treatment to the selected balcony zones.
Another example:
Use the cropped reference only for the ground floor treatment: darker plinth, larger transparent openings and a clearly readable entrance zone. This applies to the first two levels only. The floors above keep their current timber material and appearance.
Choose the right facade workflow
Not every facade prompt has the same job. Sometimes you are exploring an open design direction. Sometimes the facade is already designed in elevation and you only need to translate it into a realistic perspective image.
The workflow changes depending on the input you already have.
| Situation | Best input | Main AI task | Prompt focus |
|---|---|---|---|
| The facade is still open | Complete facade reference, precedent image or mood board | Explore a coherent facade direction | Material logic, rhythm, openings, depth, ground floor |
| The facade is already designed | 2D facade elevation, CAD elevation or PDF facade study | Translate the design onto the marked massing facade | Exact window positions, floor alignment, facade divisions, material assignment |
| The main facade works, but details are missing | Cropped detail references or short text instructions | Refine specific areas | Loggias, plinth, entrance, roof use, solar panels, people, landscape |
| The image contains the right design but feels inconsistent | Current generated result | Make the image visually cohesive | Lighting, material transitions, shadows, facade depth, atmosphere |
The repeatable process
Use the same basic sequence for both workflows:
Defined base -> facade transfer -> detail passes -> cohesion pass
The defined base is the massing image. It should already show the building volume, floor levels, facade plane, perspective and context. These are project constraints, not things the AI should invent.
The facade transfer is the first generation pass. Here, you either transfer a complete facade reference or translate an existing 2D elevation onto the marked facade area.
Detail passes come afterwards. Add or correct one thing at a time: a clearer entrance, deeper loggias, solar panels, fewer windows on one floor, people in the public space or a specific ground floor use.
The final cohesion pass should not redesign the facade. It should only make the result visually consistent.
Prompt example: open facade direction
Use this when the massing is fixed, but the facade design is still open. The complete facade reference gives the AI a coherent architectural direction.
Use the uploaded base image as the defined project base. Use the reference image as the main facade direction. Transfer its overall facade logic to the base image: a warm vertical timber facade, regular floor-by-floor window rhythm, deep recessed loggias, slim dark window frames, subtle horizontal slab lines and a darker mineral ground floor plinth with large transparent openings. The floors are separated by vertical lines on the massing model. Please keep the floors clearly separate in the final image.
Prompt example: existing 2D facade elevation
Use this when the facade already exists as a design input, but not yet as a realistic perspective visualization. Mark the target facade area in the base image, then use the elevation as the design source.
Use the uploaded 2D facade elevation as the main design reference. Translate all facade details from the elevation onto the white massing model's facade area marked in [marking color]. If transformed correctly, the elevation should fit onto the marked face with its wide red-brown brick facade, regular floor-by-floor window rhythm, slim dark window frames, projecting balconies with black metal railings, subtle horizontal slab lines, a green parapet expression at the top and a darker mineral ground floor plinth with large transparent openings.
If the 2D elevation is precise but the material concept is separate, combine both inputs clearly.
Use the uploaded 2D facade elevation as the main geometric reference. Translate its window positions, floor alignment, balcony or loggia layout, facade divisions and ground floor structure onto the white massing model's facade area marked in [marking color]. Use the separate material board only for material assignment: apply each material to the corresponding part of the elevation design, including [add material areas here, for example timber cladding, dark metal frames, mineral plinth, glass railings].
This type of prompt is useful when a facade has been developed in plan or elevation, but the team needs a fast perspective visualization to discuss the design with clients, competition teams, developers or internal stakeholders.
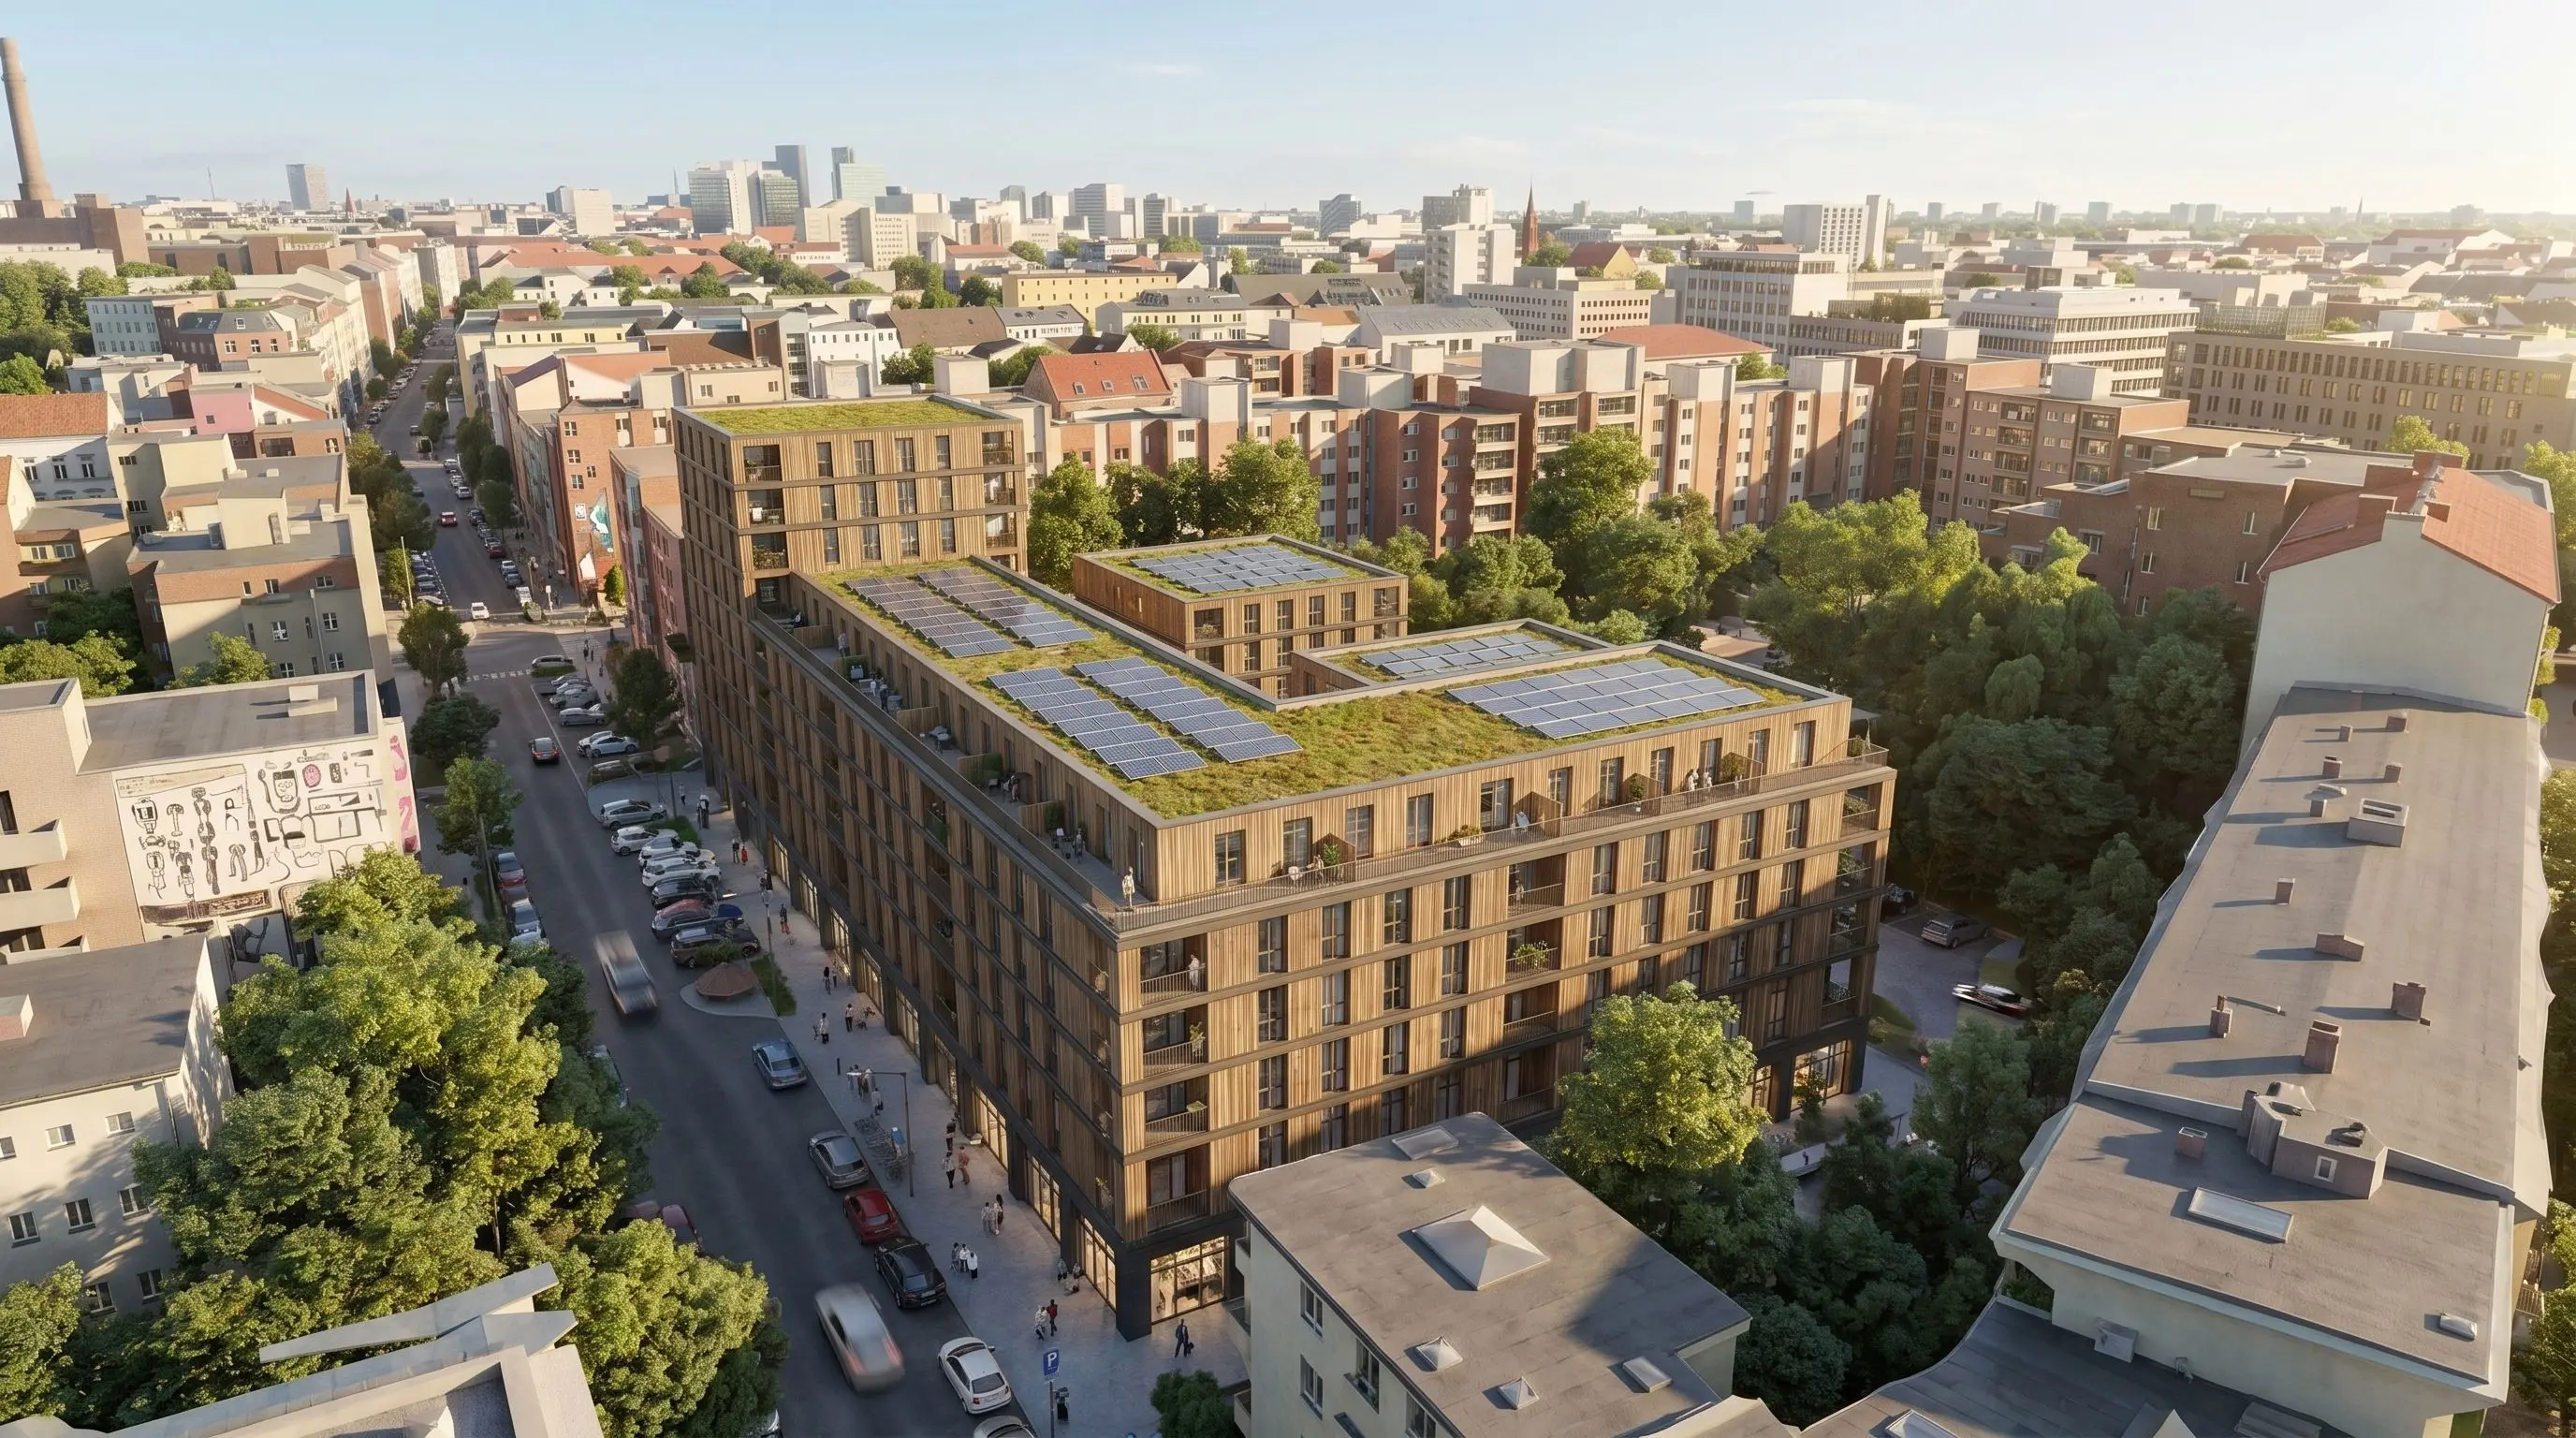
/assets/images/facade_prompting_blog/result_brick.webpName visible decisions, not only mood
Mood words are not wrong, but they are not enough. Words like premium, elegant, modern or timeless describe an intention. The AI still needs visible architectural decisions it can draw.
| Instead of only saying | Why it fails | Name the visible decision |
|---|---|---|
| Warm facade | Warm is a mood. The AI still has to invent material, tone, joints and contrast. | Vertical timber cladding, warm mineral plinth, slim dark frames and subtle material variation. |
| More depth | Depth can become random shadows, oversized balconies or heavy facade relief. | Deep recessed loggias, deep window reveals, shadow gaps and a clear facade layer. |
| Better rhythm | Rhythm is too abstract unless the model knows what should align. | Regular floor-by-floor window rhythm, aligned openings, consistent bay spacing and readable slab lines. |
| Better ground floor | The AI may add generic shops, signage or entrances that do not fit the project. | Darker plinth, larger transparent openings, clear entrance zone and active use only where intended. |
| Make it more modern | Modern is a style label, not a visible architectural decision. | Slimmer frames, larger openings, reduced material palette, cleaner corners and a clearer ground floor. |
| Use this reference and make it fit | The AI does not know what is fixed, what to transfer and what to preserve. | Define the base first, name the reference role, then transfer material, rhythm, openings and details in separate passes. |
| Add more life to the image | The AI may redesign too much or add random people, furniture, signs or planting. | Add specific use cues: a few people near the entrance, subtle planting, kindergarten play elements or an active ground floor. |
| Make the facade more refined | Refined can become decorative instead of precise. | Consistent sill heights, reduced material palette, clean reveals, controlled balcony depth and crisp roof edge. |
Result examples
The examples below show what the process can produce when the base image, facade reference, detail prompts and cohesion pass work together.


Short checklist before you prompt
Before generating, use this quick check to see whether your image, references and prompt sequence are specific enough:
- Is the defined project base visible in the input image?
- Are floor levels visible because the model is built floor by floor?
- Is the camera perspective already the one you want to evaluate?
- Is the facade plane clear and unobstructed?
- Is there enough surrounding context for the viewer to understand scale and street relation?
- Is the reference role clear: complete facade direction, 2D elevation, material board or detail input?
- Is the AI exploring an open facade direction or translating an already designed 2D facade?
- Is the task split into useful passes instead of one overloaded prompt?
- Are the visible facade decisions named clearly?
- Are project-specific details added separately from the overall facade transfer?
- Is a final cohesion or style pass planned after the important design information is in place?
Conclusion
Good AI facade prompting is not about writing one perfect mega-prompt. It is about giving the AI the right job at the right project stage.
Model what is already defined. Prompt what is still open. If the massing, floor levels, facade plane, camera and context already exist, give them to the AI as a controlled base image. If the facade exists as a reference, elevation or material concept, transfer that information clearly instead of describing it from memory.
Then work in passes. First transfer the main facade direction or elevation. Then define project-specific details. Then use a final cohesion pass to make the image visually consistent. Each pass should have one clear job.
That is how facade prompting becomes a useful architectural workflow instead of a random image generator.